

Guide to Panelized Wall Installation for Projects
A panel delivery does not solve a framing problem on its own. The schedule benefit appears only when the wall system, foundation conditions, lifting plan, staging area, connection details, and trade interfaces have been resolved before the truck arrives. Otherwise, a factory-built panel can become another jobsite component waiting for a decision.
This guide to panelized wall installation is written for project teams that need predictable execution, not just faster framing production. For commercial, multifamily, hospitality, and institutional work, the objective is straightforward: install engineered wall panels in the correct sequence, at the correct elevations, with fewer field modifications and fewer downstream conflicts.
Start Installation Before Panels Reach the Site
Panelized wall installation begins in preconstruction. The field crew should not be the first team to discover a mismatched slab edge, an uncoordinated holdown, a missing embed, or a mechanical opening that conflicts with structure. Those are coordination issues, and they need to be solved while changes are digital and inexpensive.
The first question is not, “How quickly can we stand walls?” It is, “What condition will the crew receive?” Confirm the structural package matches the latest architectural, civil, MEP, and fire protection information. Review wall tags, panel IDs, opening locations, load paths, deflection conditions, connection details, and any project-specific requirements for rated assemblies.
A complete review also addresses the building’s install logic. Panels need a sequence that reflects crane or forklift access, floor-by-floor loading, temporary bracing requirements, bearing conditions, and the order in which adjacent trades need access. If exterior walls must be installed before interior corridors, or if a transfer condition limits what can be erected above it, that sequence should be shown in the plan rather than improvised in the field.
For Frame X Systems, this is the difference between supplying steel and delivering a complete framing system. The panel should arrive as part of a resolved installation strategy, not as a loose component that creates new questions at the point of erection.
Verify the Receiving Condition
Before unloading the first bundle, the superintendent and framing lead should verify control lines, slab elevations, embeds, anchors, blockouts, and bearing surfaces. Panelized work depends on accurate reference conditions. A minor deviation can travel through multiple panels, affect corridor width, create facade alignment issues, or force field cutting that compromises the intended system.
Survey information matters most at transitions: podium-to-wood or steel interfaces, elevated slab edges, stepped foundations, shear wall locations, shafts, stairs, and roof-bearing lines. Compare the as-built condition to the engineered dimensions. Where tolerances exceed what the connection can absorb, stop and obtain direction. Shimming, slotting, or modifying a connection without engineering approval can shift loads and create a costly inspection issue.
The receiving area also needs to support the installation sequence. Panels should be staged in the order they will be erected, with labels visible and protected. Avoid stacking panels where the crew must repeatedly move them to reach the next piece. Every unnecessary pick adds labor, equipment exposure, and schedule friction.
Confirm access and lifting capacity
A panel system is only as efficient as its material handling plan. Confirm the truck route, delivery appointment, unloading zone, crane swing, telehandler capacity, and backup access before delivery. Dense urban projects, active campuses, and constrained multifamily sites often require just-in-time deliveries because there is no room to store an entire floor of panels.
The lift plan should account for panel weight, center of gravity, rigging points, wind conditions, travel distance, and the need for tag lines. Do not assume a larger panel is automatically better. Longer assemblies can reduce joints and field labor, but they may require more lifting capacity, additional staging room, or restricted installation windows. The right panel size depends on the building, site constraints, crew capability, and equipment plan.
Guide to Panelized Wall Installation: Set, Plumb, Brace, Connect
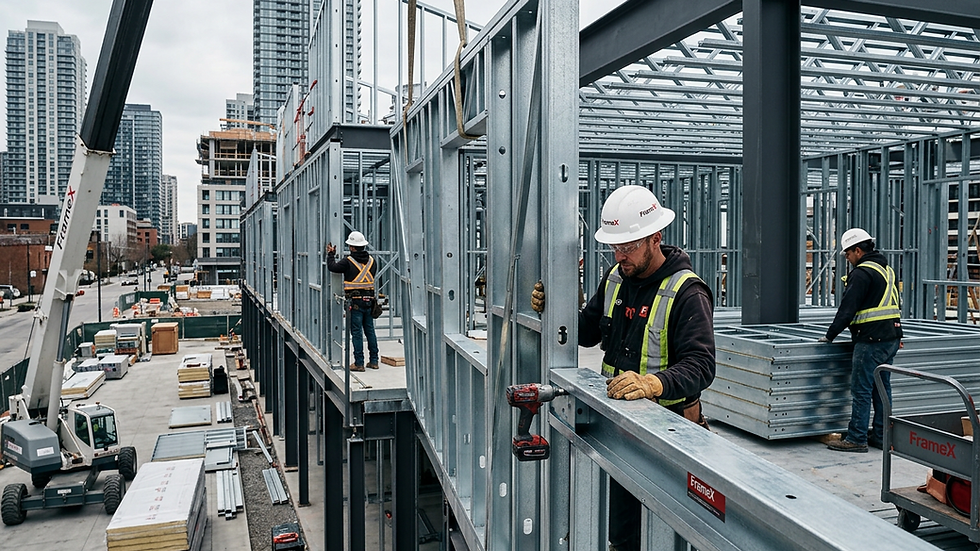
The installation sequence should follow the panel drawings and erection plan. Begin with the reference wall or corner that establishes the building grid. Set it on the verified layout line, check elevation, and install the specified initial anchors or connectors. Do not use adjacent panels to correct a mislocated starting point. A small error at the first panel becomes a major correction several bays later.
Once the first panel is set, plumb it immediately and install temporary bracing in accordance with the engineered erection requirements. Temporary bracing is not optional production work. It protects the crew, maintains geometry, and holds the system stable until permanent connections and diaphragms are complete.
Continue setting panels in the planned sequence, connecting panel-to-panel joints as detailed. Verify vertical alignment at each joint, especially at door openings, corridor runs, exterior facade lines, and stacked bearing walls. The crew should use consistent control points rather than relying on visual alignment alone.
Permanent connections must match the stamped drawings. That includes screw type, screw quantity, spacing, welds where specified, clips, straps, anchors, and any required fastener edge distances. Substituting available fasteners or adding screws without direction may seem efficient in the moment, but it can create inspection failures or alter the behavior of the assembly.
Manage openings, headers, and high-consequence walls
Openings are where field coordination often breaks down. Door and window rough openings must be checked against current schedules, hardware requirements, storefront details, and accessibility dimensions. A framed opening that is correct on an outdated drawing is still wrong.
Headers, jambs, portal conditions, shaft walls, and lateral-force-resisting walls deserve a separate quality check before the crew moves on. These locations often carry concentrated loads, special fastening requirements, or strict dimensional tolerances. They are also the areas most likely to be affected by late architectural revisions.
For rated walls, confirm that penetrations, backing, insulation, joint treatment, and approved assembly requirements are being tracked with the appropriate trade partners. The framing crew may install the wall, but the final rated assembly depends on coordinated work across multiple scopes.
Keep Quality Control Close to the Work
Panelized installation reduces field variability, but it does not eliminate the need for inspection. It makes inspection more focused. Instead of measuring and correcting every stick-built condition, the field team can verify that factory-built components are installed exactly as designed.
A practical daily check should cover layout, plumbness, elevation, panel identification, connections, temporary bracing, opening dimensions, and visible damage. Document discrepancies while the affected area is accessible. Waiting until drywall, MEP rough-in, or exterior sheathing begins turns a small correction into a trade conflict.
The project team should also maintain a clear process for exceptions. If a panel does not fit, do not force it into place or cut it to suit a field condition without review. Confirm whether the problem is a layout error, an as-built variance, a damaged panel, a drawing revision, or an uncoordinated trade condition. Then route the issue through the responsible design and engineering team with photos, location information, and measured dimensions.
That discipline protects the schedule. A fast decision based on incomplete information often creates a slow correction later.
Coordinate the Next Trade Before Releasing the Area
The value of panelization is realized when the installed wall supports the work that follows. Before releasing an area, confirm where MEP penetrations, sleeves, backing, access panels, equipment supports, and firestopping requirements intersect the framing. A coordinated system reduces the number of field questions, but crews still need current drawings and a defined handoff process.
This is especially critical at bathrooms, kitchens, corridors, electrical rooms, shafts, and utility-intensive amenity spaces. These areas have limited tolerance for misplaced studs, missing backing, or conflicts between ductwork and structural members. Early verification keeps one trade from undoing another trade’s completed work.
Panelized wall installation is not a race to stand the most panels in a day. It is a controlled sequence that converts coordinated design into installed structure with minimal field interpretation. When the engineering, fabrication, delivery, layout, lifting, bracing, and connection plan all align, the crew can move with confidence and the project gains time where it matters most: before avoidable problems reach the jobsite.


Comments